zfn9
zfn9
Ever looked at two images and thought, “These feel the same somehow,” even when they aren’t identical? That gut feeling actually has a technical side, and no, you don’t need to be a machine learning whiz to get it. Thanks to Hugging Face’s Datasets and Transformers libraries, working with image similarity is far more accessible than it sounds. Let’s break it down into something you can work with—and maybe even enjoy doing.
You’ll be surprised how much you can achieve with just a few lines of code. The hard part—model training, data wrangling, optimization—has already been done for you. What’s left is plugging the right pieces together and making them do what you need.
Why Image Similarity Matters
Image similarity isn’t just about finding identical copies. It’s about finding images that look alike to the human eye, even if the pixels don’t match one-to-one. Whether you’re building a duplicate photo cleaner, recommending similar products, or clustering visuals for a design tool, this is the stuff that helps machines “see” better.

Traditionally, image similarity relied on things like histograms or pixel comparisons. But those techniques fall short when images have different resolutions, lighting, or angles. That’s where Transformers come in—they help models compare the meaning behind an image, not just the colors.
Setting the Stage: Loading the Dataset
Before you can compare anything, you need something to compare. Hugging Face makes this step surprisingly light. The datasets library allows you to pull popular image datasets with just a few lines of code—no messy downloading or extracting.
from datasets import load_dataset

dataset = load_dataset("beans", split="train")
Yep, that’s it. This loads a small dataset of bean plant images, which is perfect if you’re just testing things out. Need something bigger? There are hundreds of image datasets available, and you can swap one line to pick another. It really is that flexible.
However, the images are not in PIL.Image format by default. So if you’re using any model from transformers, you’ll want to convert them first.
from PIL import Image
import numpy as np

def convert(example):
    example["image"] = Image.fromarray(np.array(example["image"]))
    return example

dataset = dataset.map(convert)
Done. Now you’ve got real images ready to process.
Bringing in Transformers for Vision Tasks
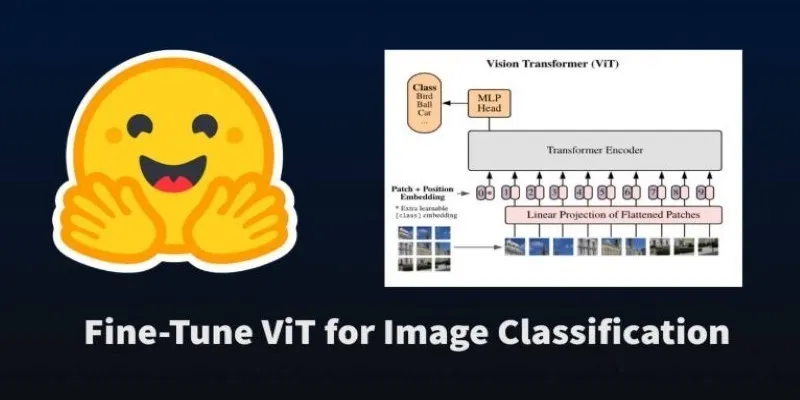
When people hear “Transformers,” they often think of text. But over the past few years, vision transformers (ViTs) have caught up. These models treat images like sequences—the same way they handle text, which means they can “read” images and understand the patterns just as well.

To get started, pick a pre-trained model and a feature extractor. The feature extractor helps prepare the image so that the model can make sense of it.
from transformers import AutoFeatureExtractor, AutoModel
import torch

extractor = AutoFeatureExtractor.from_pretrained("google/vit-base-patch16-224")
model = AutoModel.from_pretrained("google/vit-base-patch16-224")
Now let’s grab two images from your dataset and run them through the model to see how similar they are.
image1 = dataset[0]["image"]
image2 = dataset[1]["image"]

inputs1 = extractor(images=image1, return_tensors="pt")
inputs2 = extractor(images=image2, return_tensors="pt")

with torch.no_grad():
    emb1 = model(**inputs1).last_hidden_state.mean(dim=1)
    emb2 = model(**inputs2).last_hidden_state.mean(dim=1)

similarity = torch.nn.functional.cosine_similarity(emb1, emb2)
print(similarity.item())
That number you see? It tells you how similar the two images are—closer to 1 means more alike. Closer to 0 means they’re pretty different.
Building a Simple Similarity Search Tool
If you’re looking to expand on this idea and build a working image similarity system, here’s a simple guide. No fluff—just what you need:
Step 1: Load and Preprocess Your Dataset
Start with any dataset that suits your needs. Make sure your images are in a format compatible with the model. Use the datasets library and handle preprocessing with PIL and NumPy as shown earlier.
Step 2: Choose and Load a Pre-Trained Vision Transformer
Stick to models like google/vit-base-patch16-224 or any other ViT from Hugging Face’s library. Pair it with the corresponding feature extractor to ensure inputs are correctly shaped and normalized.
Step 3: Extract Embeddings
This part is key. Run each image through the model and store the resulting vector. These embeddings are what you’ll compare later. Use .mean(dim=1) to get a single vector per image.
def get_embedding(image):
    inputs = extractor(images=image, return_tensors="pt")
    with torch.no_grad():
        output = model(**inputs).last_hidden_state.mean(dim=1)
    return output
Step 4: Compare Using Cosine Similarity
Cosine similarity works well because it compares the angle between two vectors rather than their magnitude. This makes it less sensitive to brightness and contrast differences.
To compare an input image to every image in your dataset:
from torch.nn.functional import cosine_similarity

def find_similar(query_image, dataset_embeddings, dataset_images, top_k=5):
    query_emb = get_embedding(query_image)
    sims = cosine_similarity(query_emb, dataset_embeddings)
    top_indices = sims.argsort(descending=True)[:top_k]
    return [dataset_images[i] for i in top_indices]
This gives you the top matches. You can plug this into a UI or even just save the top images to disk.
Things to Keep in Mind
Let’s not overcomplicate it. You don’t need to train your own model unless you have a very niche dataset. Pre-trained models, especially ones trained on ImageNet or similar collections, already “understand” general visual patterns.
Also, your embeddings should be calculated just once and stored. Doing it on the fly for each comparison will slow everything down. A quick save to disk using torch.save() can help you keep things smooth.
Final Thoughts
Image similarity doesn’t need to feel intimidating. Hugging Face offers everything—from curated datasets to powerful Transformer models—in a way that’s surprisingly practical. With just a few steps, you can build something useful that doesn’t just see images, but starts to understand them. Whether it’s organizing a gallery, improving search results, or building something entirely new, you’ve got the tools. Now it’s about trying it out and seeing where it takes you.